Site: Danish | English
3: No idle ?
6: Not much light on an old Guzzi.
Technical : The complex stuff - exciting but heavy reading, take your time.
Please contact Gregory Bender with any questions, corrections, or suggestions for improvement.
Mikael's Story
3: No idle ?
Back to my own project. The weather in Denmark is rather unstable and October/November 2002 was no exception. I was beginning to realize that I wasnt going to drive my bike this season. But why on earth didnt it want to idle?
There are a lot of possible answers – one being an adjustment of the carburettor. They had been dismantled for a thorough cleaning; various parts had been replaced as it looked as if the former owner had used a sledgehammer to mount nozzles and the likes. The choker system works by lifting two small levers opening a channel and securing a richer mix to the engine. In the bottom of these two levers you find a small rubber seal. These were changed. The choker cables were adjusted and oiled as especially one of them worked somewhat slowly. The cables themselves looked a bit crumbled but have not been switched up till now.
I did as Haynes prescribed – the mixing screws were 1.5 turns out from full in.
Had by the way bought 2 new gas cables as the old ones were rotten. I checked that the idle screws were indeed able to lift the throttle valves but nothing helped. The bloody engine refused to run idle, even with the idle screws full in. The engine ran more and more slowly and died out. I was looking everywhere for an easy solution to the problem but none seemed to be around. I knew that the plugs were firing at the 8 degree mark; petrol was reaching the carburettors - now the only thing left to check was compression.
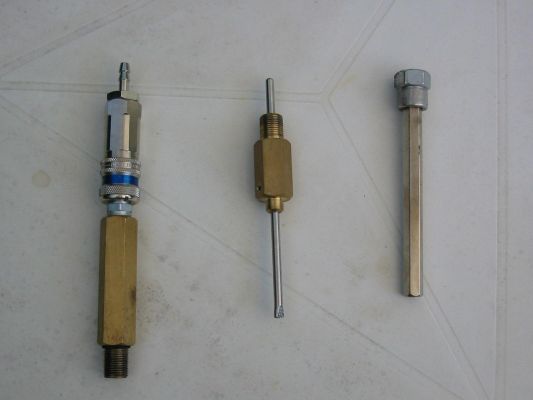
I had no – and still do not have – compression tester – but I read somewhere about a so called “leak-down” tester. In principle it works by pumping air into the cylinder with the piston at top level in the compression stroke. Then a couple of indicators show whether air is leaking out and if - how much. It sounded very smart but I didnt posses such an instrument neither did I have a compressor. Luckily my brother in law had access to a lathe and was able to borrow a compressor at work. So in the end after some discussion the plan was like this: we make a device that can be screwed into the plug hole with a connecting piece for an air compression hose. We then planned to open slowly for the compressed air with a reduction valve. The idea was then that we should be able to hear the air leaking out either from the exhaustion pipe or from the breather pipe if there were any leaking valves or piston rings.

Misc. special tools.
My brother in law was hooked on the idea – especially because it was my Guzzi that was the guinea pig. It is, however, great with a helping hand when you are working on a big project.
The day arrived and we started by finding the top point – or just about – setting it into 5th gear and step on the brake pedal, so that nothing “funny” would occur when we put compressed air into the cylinder. Very slowly we opened the reduction valve and at a certain stage there was a distinct sound from the exhaustion. What do you know – a leaking exhaustion valve? At the other side there were sounds from both the breather pipe and the exhaustion so there was both a leaking valve and something wrong with the piston rings.
This wasnt exactly what I was hoping for. But at least I now had a good explanation for the engine not to idle. It would have been fun to know how much compression it had, but it cant have been very much. Actually it was pretty amazing that it was able to run at all.
Now was the time to read the chapter in Haynes on how to dismantle the top of the engine. It didnt look all that impossible so after having considered it for a while I decided to take it on myself.
At this point, zip lock plastic bags turned out to be an amazing invention. Apart from holding food, they are brilliant at holding all the small bits from a bike. Put all bolts, rocker arms, clamps, springs and what it is all called, into some bags – write on the bags where they originated from – zip up and you have everything under control. Then put all the bags in a box from Jysk for 20,- DKK.
A digital camera is another handy thing. Being a sissy I took lots of pictures during the process. I highly recommend it. If you havent got one, borrow one.

Rocker with spring and disc.
For all kinds of work the right tools are important. Like a butcher needs good knives a mechanic needs a few screwdrivers and stuff like that. To work on a Guzzi you dont need many tools. At least not for the more common tasks. A decent set of box spanners – I have one from Biltema for about 300,- DKK – a set of ring fork spanners doesnt cost much either and some good screw drivers. If you havent got everything you need it is always a good idea to put it on you list of Christmas wishes as my wife and the rest of my family sometimes tire of my wish for socks and underwear.
A few words about my “garage” I only have a tool shed to work in. After a feeble attempt to get permission to work on the bike inside our small house I gave up. It is not very pleasant to work with your bike in 10 degrees celcius below zero in an unheated shed. It is feasible – but far from ideal. But with a thick sweater and a heater turned up high it is endurable. When my wife wins the Lotto and we can afford a bigger house, it has to come with a garage with double brick walls where I can fiddle with my stuff, have a fridge for beers, a table for my tools a lathe and so on, and everything has to be nice and orderly. Anyway – I havent got that and less will do.
Off with the exhaust, the carburettors, the 2 coat sides side fairings and the valve covers. Wow – it looks like the picture in the book. No surprises so far. Off with the rocker arms, up with the push rods – remember to bag it and note where it came from.
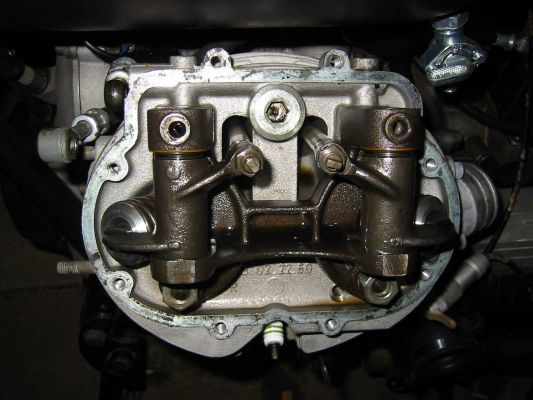
Now the exciting part – time to dismantling a cylinder head. At the very back you find an aluminium cover – by many called a plug - which covers one of the nuts that keeps the cylinder head fastened.

Aluminium plug clearly visible heret.
This plug was stuck – and I mean very stuck. After having tried I gave up loosening it, and my brother in law had a go. He has bigger biceps than I do, but he couldnt either.
A few gentle blows with a hammer didnt do the trick either. I had a bit of water pipe lying around and we tried that to elongate the hex wrench, but even then it took something very close to violence to get it off. Strangely enough nothing broke – but we realized that someone had used Loctite to fasten the damn thing. Some heat would have loosened the plug, but how were we to know?
Anyway – off it came. The rest was a piece of cake. The cylinder head came off and a visual inspection revealed that it wasnt entirely new. The valve stems had fat coatings, the valves – especially the exhaust valve – were burned. Time to take off the cylinder and to our big surprise it turned out to have an iron liner. A guy I had communicated with on the Internet swore that there were no Le Mans left with iron liner. In 1981 (approx) the Guzzi factory switched to another technique called Nicasil, which is a hard surface put on top of aluminium. I dont know exactly what it is – but it certainly is something other than an iron liner.
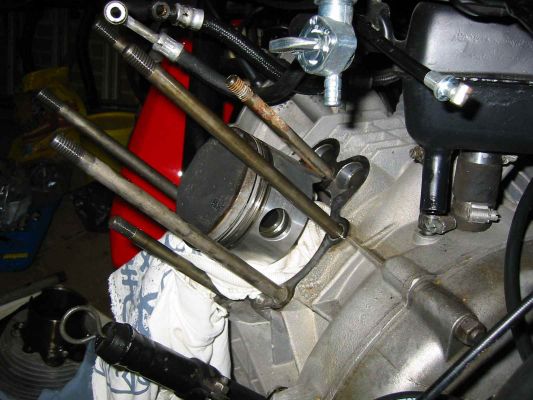
But mine was of the old type. Well – Id have to worry about that later – off it went and the piston too. Piece of cake. Remember to put a big rag in the hole in the cylinder block so nothing falls down into it.

Favorite T-shirt sacrified.
After having taken one side apart, the other side came off easily. It looked almost as bad as the first one.
When it comes to cylinders it hasnt been possible to find oversized pistons for many years. I did not feel like experimenting with alternative pistons, but luckily enough spare parts are not that expensive.
There was nothing more to be done than to sigh a little and then go ahead and buy two new cylinders and two pistons. A cylinder including piston cost about 1500,- DKK if you buy it in Germany via the Internet. I could have chosen to put in bigger cylinders and pistons to bring the motor size up to 1000 cc (950) but I thought 850 would have to do it. The price difference is not that big and you can easily install the bigger set, if you should want to. But more about that laterJ
The spare parts arrived and the cylinder heads were sent to Ingana in Copenhagen with new valves, valve guides and springs. Furthermore I asked them to change the valve seats. The whole thing cost me 2400,- DKK and they made a good job. I can highly recommend them. The guy in there told me that the cylinder heads were in good shape and that they didnt have to mill the gasket surface. It was a nice to hear from someone who knows these things, that my Guzzi had some good points….
The day of assembly began. Piston on connecting rod (you get a whole new vocabulary when you acquire a Guzzi), then a new base gasket and some O-rings in the right places. With the help of my brother in law to keep the piston rings in place,it was easy to slide the cylinder on. REMEMBER to turn the gasket right, as there is a hole for the oil channel.
At this stage I sent a friendly thought to the guy who invented zip-lock bags. Easy to install the cylinder head, when all the parts are there. Strangely enough I had the foresight to buy a torque wrench, which is a must have when you tighten cylinder heads. 4-4,5 kg torque. A small trick I read somewhere – leave it during the night and tighten once more. And my little friend from earlier on – the aluminium plug was not glued with Loctite!
Cam followers, push rods, clips for rockers arms and the arms themselves were mounted after having checked a couple of pictures I took during dismantling. No problems what so ever. The other side was fixed just as easily. Nothing to report – everything went smoothly.
By now it was slowly starting to look like a (motor) bike again after having looked somewhat sad for a long time. Then it was time to adjust the valve clearance. I have bought a 0,22 mm feeler gauge. Others might be able to adjust the valve clearance by “gefühl” but I wasnt about to try it. The feeler blade gauge cost me about 30,- DKK and will last the rest of my life, so that money was wisely spent. I am not very good at adjusting the clearance – usually it takes a few tries until it is quite right. I dont know why, but that is how it is, and I have leaned to live with it.
On with the valve covers, oil hoses, fairing sides, exhaust, gas and choker cables, petrol hoses and so on. Finally the bike was assembled again.
My brother in law and I looked each other into the eyes and agreed that nothing had been forgotten. No screws or other small parts left over, so it couldnt be all wrong.
A fully charged battery was installed; I opened the petcocks, choker on, turned the key – and 3 deep breaths before I pushed the start button. It started second time around. Did I feel cool? Youve guessed it….
One thing was that other peopled helped and gave good advice – but I did the job myself! What a feeling. My wife came out and said something about us being rather noisy, but as far as I remember, I didnt care much.
And now it was able to idle after having fiddled around with the idle screws. The start motor was harder pressed turning the engine which was a sure sign of more compression.
