Zinc plating
My experience setting up a functional zinc plating bath.
Disclaimer
DANGER! DANGER! DANGER! The information and techniques presented on this page are suitable for entertainment purposes only. The chemicals and processes described on this page can be very hazardous to your health and quality of life. The author is not an expert. If you choose to follow any of the instructions described on this page, you do so at your own risk and you accept full responsibility for your actions. DANGER! DANGER! DANGER!
Purpose
It is possible to create an inexpensive, effective, and SAFE zinc plating operation suitable for the home enthusiast who wants to occasionally do small batches of zinc plating. This page describes one way of doing that.
The zinc plating I have produced would be classified as dull in color. It is not bright. It does not look like chrome, nickel, or polished stainless steel. It does not have the luster of cadmium plating. It is a basic zinc gray color whose sole purpose it to act as a sacrificial coating and protect the steel underneath. I wish I could produce bright zinc, but I have not yet figured out how to do that.
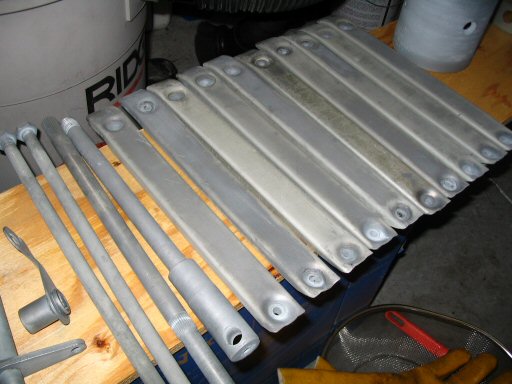
Photo courtesy of Gregory Bender.
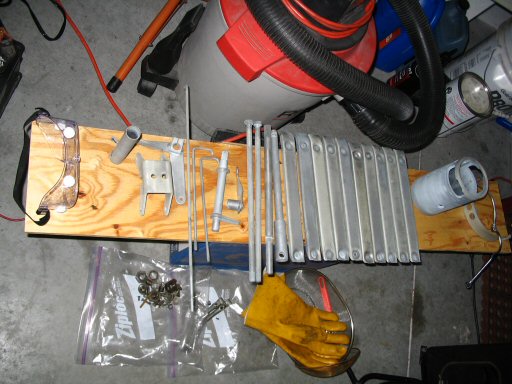
Photo courtesy of Gregory Bender.
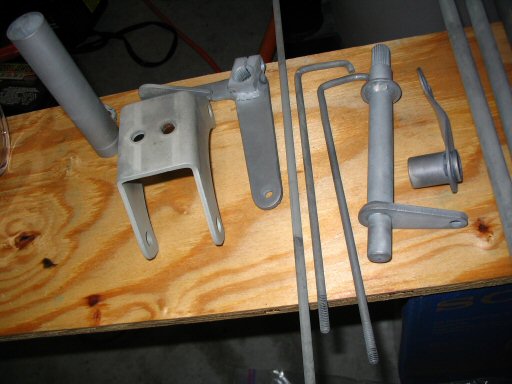
Photo courtesy of Gregory Bender.
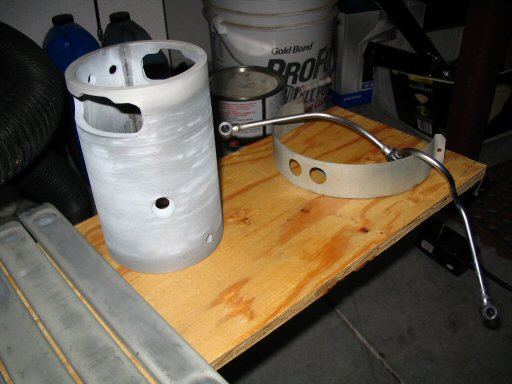
Photo courtesy of Gregory Bender.
Safety
The chemicals involved in zinc plating are not the most inert known to mankind. You will be using acid and lye that can burn your skin and blind you in an instant. There will be fumes that are also nasty. With knowledge, care, and a few pieces of safety equipment, you can be safe. Don't want to learn safe practices? Don't want to follow safe practices? Don't want to buy the gear? Then don't do this. Here are some risks and safe practices to help mediate the risk. (source: FAQ file at the old Yahoo! Electroplating news group). There are certainly additional risks that are not listed here.
-
Risk: Children or other people get into your baths by accident.
Safe practice: Label all your baths and chemicals. Keep all baths and chemicals beyond access from children. -
Risk: Risk of having acid and lye violently boil up on you when you initially mix your bath up.
Safe practice: Always mix the acid, lye, and other chemicals into the water. NOT the water into the chemicals. -
Risk: Spilling or splashing the electroplating bath on your skin or eyes.
Safe practice: Wear rubber gloves, apron, goggles and a face shield. -
Risk: Inhaling fumes from your electroplating bath or your acid etching bath.
Safe practice: Have good ventilation. Either outside or have a hood to exhaust the fumes off your bath. -
Risk: Burning your fingers from overheated wires on your cathode.
Safe practice: Use the right size wire to hang your part on. -
Risk: Spilling the electroplating bath on the ground.
Safe practice: Make a spill bucket to deal with your spill should this ever happen. Include absorbent materials and acid neutralizers. -
Risk: Electricity and water.
Safe practice: You will be passing current through a liquid. Don't become part of that circuit.
Getting rid of chemicals and baths
BE RESPONSIBLE!!! Please do not throw any chemicals or baths on the ground, down your drain, or in your trash. You don't want to drink it or bathe in it and neither do I. You also don't want some unwitting refuse employee getting lye all over his skin when your container breaks. Instead, take it to your local hazardous materials collection site and dispose of it there. Most communities have collection days where you can drop off things at no charge. If you have an appropriate location, you can even leave the lid off your baths and let the water evaporate...then only have the remaining residue to take to the hazardous material collection site.
Materials
Here are the materials I use:
- Long rubber gloves that go part way up my arms.
- Goggles with an elastic strap that fits around the back of my head.
- Face shield.
- Shoes, socks, long pants, long sleeve shirt, etc. Cover yourself well.
- A strong electric fan to blow the fumes away from me.
- Containers for the electroplating baths: four, 5-gallon buckets with lids that have O-ring seals. Smaller containers could certainly be used, but 5-gallon buckets can safely hold 4 gallons of liquid and some pretty large parts.
- Wires for dipping parts and hanging them as cathodes in the electroplating bath. I used solid copper wire I removed from standard household electrical conduit (Romex). If you really get a small run going, you'll want a couple dozen pieces.
- Bar on which to hang the wire in the electroplating bath: a length of copper pipe long enough to sit across the top of the 5-gallon bucket.
- Zinc Anode: A 99.9% pure zinc anode used on salt water boats. These are inexpensive and readily available in marine stores. I purchased a large anode for USD $13.55 delivered on ebay.
- Power supply: I used a 12 volt battery with a battery charger continually connected and charging. It works okay, but I really want a constant amperage, constant voltage power supply.
- Thanks to Jason Telford for sending me the following information. Jason has much more knowledge in this area than I do.
I just use a 3 V 500 mA Walmart power supply as the current source. It costs USD $4.00 from PartsExpress and anything above ~2 V is wasted anyhow. I can plate about 0.5 g nickel per hour with it and there is not much waste due to electrolysis of water.
Bath composition
Here is the composition of my four baths. I don't claim the baths to be correct or even good, but they have worked for me.
Remember to always put the water in the buckets first, then add the other ingredients.
Etching bath:
- 2 gallons of distilled water.
- 2 gallons of muriatic acid. Also known as swimming pool acid. It is commonly available in most hardware stores.
Pre-plating rinse:
- 4 gallons of distilled water.
Electroplating bath:
- Distilled water
4 gallons of distilled water. - Zinc oxide powder
8 oz (by weight) of zinc oxide powder. This works out to 1 oz - 2 oz per gallon. This is the stuff that lifeguards put on their noses to prevent sunburns (only they use a lotion form). This is a white powder. I purchased 1 pound for USD $16.86 delivered on ebay. - Sodium hydroxide (NaoH)
48 oz (by weight) of sodium hydroxide (NaoH). This works out to 10 oz - 12 oz per gallon. This is also known as as lye. I purchased 5 pounds for USD $23.40 delivered on ebay.NASTY STUFF! Do not let it touch any part of your skin. It will burn instantly. If you get it in your eyes you will be blind. Be very, very, very, very careful with this stuff. Always add this to your water. Never add water to the dry powder sitting at the bottom of the bucket. A chemical reaction will violently boil the water instantly. Not good. NASTY STUFF!
- Niacin
I also added a bottle of Niacin (purchased from the Walmart pharmacy) in an attempt to add a brightening agent to the bath. It didn't seem to work for me. Maybe I didn't use enough. It is certainly NOT a critical component in the bath, but I wanted to list it here for full disclosure. - Molasses
I also added most of a small bottle of Molasses (purchased from the grocery store) in an attempt to add a brightening agent to the bath. I think it helped some, but it certainly wasn't a night-and-day difference. If I had to create my bath again, I'd add it in again. I don't believe the quantity is critical, but it is used up as the bath is used and will have to be added. - Thanks to Jason Telford for sending me the following information. Jason has much more knowledge in this area than I do. I haven't tried saccharin yet.
I wrote up a lab for our undergraduates to do nickel plating - which works very well - and what I learned as I wrote it up was that saccharin is often used as a brightener (at least in nickel baths). Niacin and saccharin are both coordinating ligands (makes a bond to the metal), but saccharin is much weaker, so it might be a better transfer agent. I think it also affects how the metal is deposited - makes it more columnar deposition. You might give it a try. I used Sweet n' Low - two or three packs per liter of solution.
- Thanks to Grant Bowyer for sending me the following information about his experience.
I, too, had trouble achieving a bright finish. I'm definitely going to try the niacin idea. Currently I'm just using vinegar, epsom salts, and white sugar. I have also found a few techniques that help my parts come out a bit brighter:
- I polish the piece to be plated before plating. Usually a stainless wire brush is enough, but for a better finish I'll use Autosol or similar polishing compound and make the steel really shine.
- I don't use an etching bath stage (but I'm going to try it now!), instead I wash the pieces off with grease and wax remover, and from there only touch them with gloves on to avoid skin oils.
- You mention a low voltage power supply - I found that the plating was shinier using a 5 volt supply than with the 12 volt battery charger. I use an old computer power supply for the high-current 5 volt.
- My parts come out dull grey like yours - but if you brush the grey finish with a soft brass brush, you should find much shinier zinc hiding underneath. I usually brush my parts under running water when rinsing the plating solution off.
Here's an early post from my restoration blog - the finish I'm getting now is better than shown here.
- Thanks to Rosniel Gonzalez Valdés for sending me the following information about his experience.
I have tried caustic soda, and zinc chloride electrolytes for Zinc plating, and I encourage you to try the following one, because it solve the bright issue to me and I hope it can make the same for you!!
If you want a very bright zinc plating, this is the brighter it can get:
- Dissolve two spoons of zinc oxide in enough white vinegar, stirring thoroughly and adding vinegar until you have dissolve almost all of the zinc oxide (usually it takes more or less 750 ml white vinegar).
- Then filter to eliminate residues.
- Now add distilled water to make one liter solution.
- Then add 5 ml of clear or white glue (read the glue composition, it most contain PVA: Polyvinyl Alcohol or a mixture of PVA and Polyvinyl Acetate).
- Then add 3 ml of artificial vanilla extract (it most be the clear one).
- You need to previously polish your pieces, before the preparation you describe so well in your Webb.
- The greater the electroplating time, the better the look the pieces will get.
- I use a fine polishing compound with the soft wheel to grant the final aspect to the work, and the result is as bright as the best nickel and chromium plating I've seen.
Give it a try, it work really good and safe Have a nice day.
Electroplating bath alternative (I have not tried it, but it is supposed to produce much shinier/brighter zinc):
This bath is described in more detail on the Honda 305 forum.
- 5 gallon bucket with lid
- 4 gallons of white vinegar
- 4 pounds of epsom salt
- 4 pounds of white sugar
Final rinse:
- 4 gallons of distilled water.
Plating out
Before the electroplating bath can be used on real parts, it must be plated out
. This is done by plating a 2 inch × 2 inch scrap piece of steel for 12 hours.
Parts that should and should not be plated
You can certainly plate anything you want to, but some parts will lend themselves to better results than others. In my experience, it is difficult to get good results with parts that have seams or joints. This is because it is very hard to thoroughly rinse all of the acid from the etching bath prior to plating. The result is that the parts will corrode very quickly right where the joints and seams are located. The same is true for pipes, tubes, and holes. If they don't get rinsed very well, corrosion will begin there very quickly.
Steps
Always test with a few old nuts and bolts you don't care about first. It will give you a feel for the process and you won't destroy any real parts in the process.
Here are the steps involved:
- Parts preparation. This step is critical to success and can not be overlooked. Failure to properly prep the parts will result in poor and/or spotty zinc adhesion to the substrate. This step is time consuming and not a lot of fun, but it is necessary. Basically, you must remove all paint, grease, and dirt. Clean it until you would eat with it, then wash it with soap and water, rinse and dry. The acid in the etching bath will not etch oil or paint covered steel. Also, you do not want to contaminate your baths with nasty chunks that will then get stirred up and land on your parts, resulting in poor plating. Don't cut corners here.
- Hang the part. I start by hanging each part from a length of copper wire. Some parts are easier to hang that others because they have a natural location for hanging. Very small parts, however, are more difficult. But, I just bend the wire into a shape by the part can be supported and call it good. Do be careful not to drop parts into your bath. I can be a challenge to get them out...and a long magnet you don't mind getting ruined is a great help when fishing them out. I know some people have used small metal baskets to handle the tiny parts. I haven't had very good luck with this method because I get a lot of shadowing (uneven coverage) during the plating bath.
- Etching bath. Suspend the part from a length of copper wire in the etching bath for 1 - 4 minutes. It may bubble in the beginning and then stop bubbling after a while once the original zinc has been removed. When I get going on a small run, I hang a number of parts on the side of the bucket.
- Pre-plating rinse. Immediately after the etching bath, rinse the part in the pre-plating rinse at least 30 seconds. Essentially, you remove the part from the etching bath and immerse it immediately in the pre-plating rinse. If the part is oddly shaped or has compartments, be sure to move the part around in the pre-plating rinse to fully rinse the acid from the etching bath. Do not touch the piece with your gloved fingers...only handle it by the copper wire. If you touch it, it gets a trip back to the etching bath. When I get going on a small run, I hang a number of parts on the side of the bucket.
- Plating bath. Immediately after the pre-plating rinse, immerse the part in your plating bath. Hook the copper wire over the copper pipe that is sitting across the top of your bucket.
- The negative wire from your power supply will be connected to the copper pipe.
- The positive wire from your power supply will be connected to the zinc anode (which is also at least partially immersed in the plating bath).
- The zinc anode and your suspended part must not make direct contact.
- Turn on your power supply and you will start to see bubbles come up to the surface as the zinc ions are being transferred from the zinc anode to your part (the cathode).
- There are specific amperage's and durations that can be calculated for the surface area to be plated on each part. Honestly, I've never bothered to figure this out. I do know that the amount of time (unless left plating for way too short or way too long) has not made an appreciable difference in the quality of zinc coating I've gotten.
- About half way through the plating, I flip the part around 180° and hang it on the other side of the copper pipe. In doing so, I'm attempting to get even coverage on the part and prevent
shadowing
where one side is plated much more thickly than the other side. - How long do I plate? Well, it all depends on how large the piece is. Small pieces may only require 30 seconds. Large pieces as long as several minutes. Don't be afraid to pull the part out of the bath and have a look. You can always just drop it back in. After just a little while, you'll get a feel for how long it takes to plate the pieces you are doing.
- With large pieces, I do them one at a time. But, if I have numerous small pieces (small nuts and bolts, etc), then I'll do several of them at once.
- Before I begin and every few minutes thereafter I stir the chemicals in my plating bath. Perhaps this is normal or perhaps I used too many chemicals or not the correct chemicals or whatever, but my zinc oxide and molasses tend to settle at the bottom. So, I stir them up and keep my bath nice and cloudy.
- Final rinse. Immediately after the plating bath, immerse the part in the final rinse for 30 seconds. The purpose of this rinse is simply to dilute the chemicals from the plating bath.
- Dry. Towel dry each piece immediately after the final rinse. Don't be surprised if your towel gets a little gray from the extra zinc that didn't adhere fully. But, you should be left with a nicely plated piece. Set the piece aside to fully air dry. I like to place each piece - not touching - on a long piece of plywood. The wood absorbs any moisture and the separation of pieces prevents spot rusting. You could also just hang them up all around your garage, etc.
The good news is that if you make a mistake, you can just start right over again with the etching bath and run the part through again. The nice thing about zinc plating is that it is pretty forgiving.