Moto Guzzi V700, V7 Special, Ambassador, 850 GT, 850 GT California, Eldorado, and 850 California Police models
Created:
Updated:
Thanks to Bruce Giller for sending me this information via email. In Bruce's own words and photos.
Loopframe petcocks are manually operated units (like you never forgot to turn them on at least once whilst starting a ride....) and the fuel is gravity fed. Most of these petcocks are simple On/Off units with a minimum of moving parts inside. There is a handle that can be rotated in either direction sometimes with soft dents at 3, 6, 9 o’clock facing the handle. There are two positions that allow fuel to flow, 6 and 12 o’clock positions. My Eldorado’s gas tank blocks the handle from rotating all the way to the 12 o’clock position.
Configuration
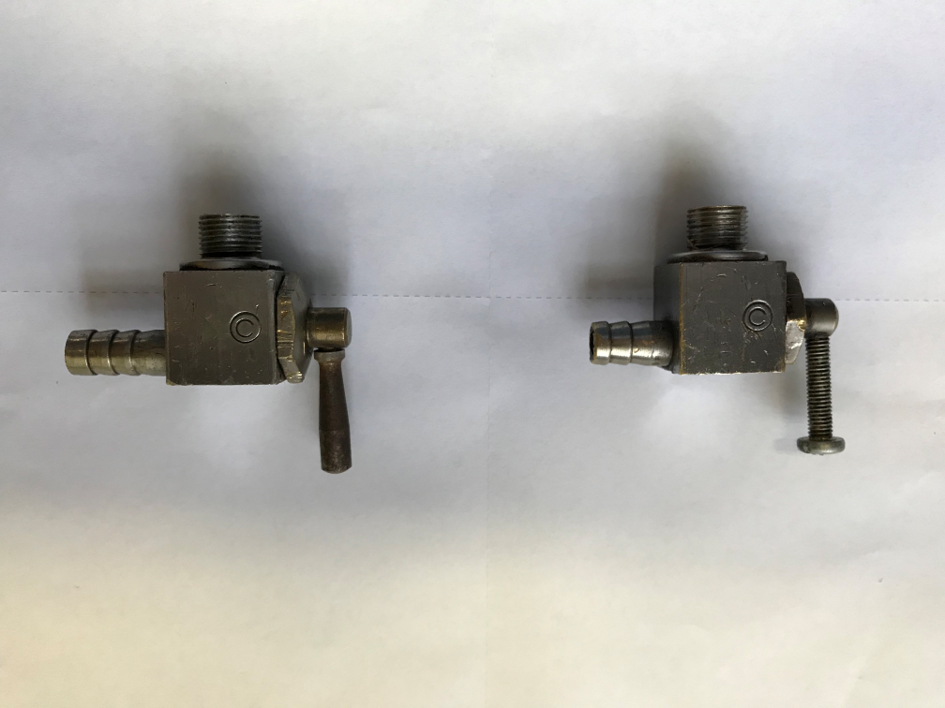
All Loopframe petcocks have the same configuration with regard to the fuel inlet and outlet spigots orientations. They are both at 90 degrees to each other with the outlet directly opposite the handle. Figure 1 shows two petcocks to illustrate the differences: a Ducati Paioli petcock is on the left and a Loopframe Orlandi model is on the right.
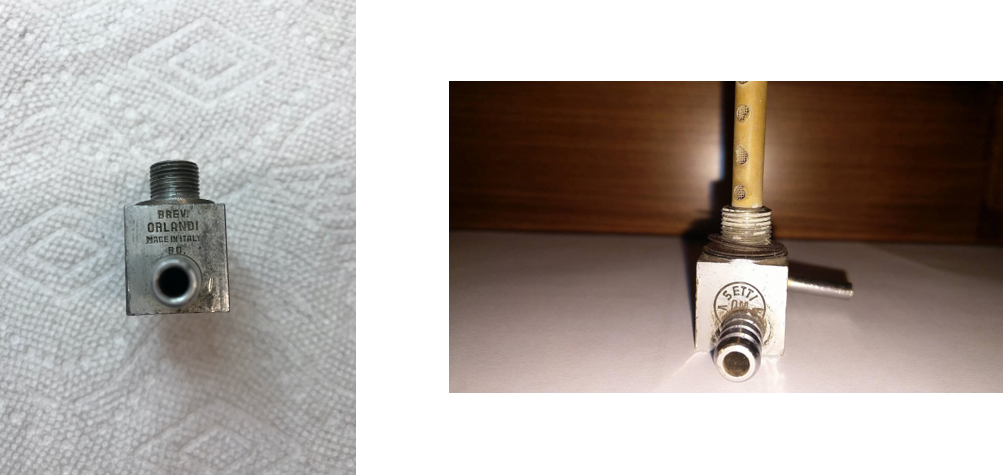
I have come across two petcocks that have been stamped with a manufacture’s name, Orlandi and SETTI. The names are stamped on the petcock body by the outlet spigot. When the petcock is on the bike it is hard to see or read the stampings at all. You will need a mirror-on-a-stick, a strong flashlight, and the ability to read letters backwards. Figure 2 shows the backside of these two manufacturer’s petcocks.
Figure 2
Photo courtesy of Bruce Giller for photo on left; Pedro Fogaça of Portugal for photo on right.
Figure 2
Photo courtesy of Bruce Giller for photo on left; Pedro Fogaça of Portugal for photo on right.
Another manufacturer who stamp their petcocks is BAP which are used on the LeMans 1000. BAPs could also be used on the V65 but the one example I examined did not show BAP but the design was exactly like the one on the LeMans 1000.
Internals
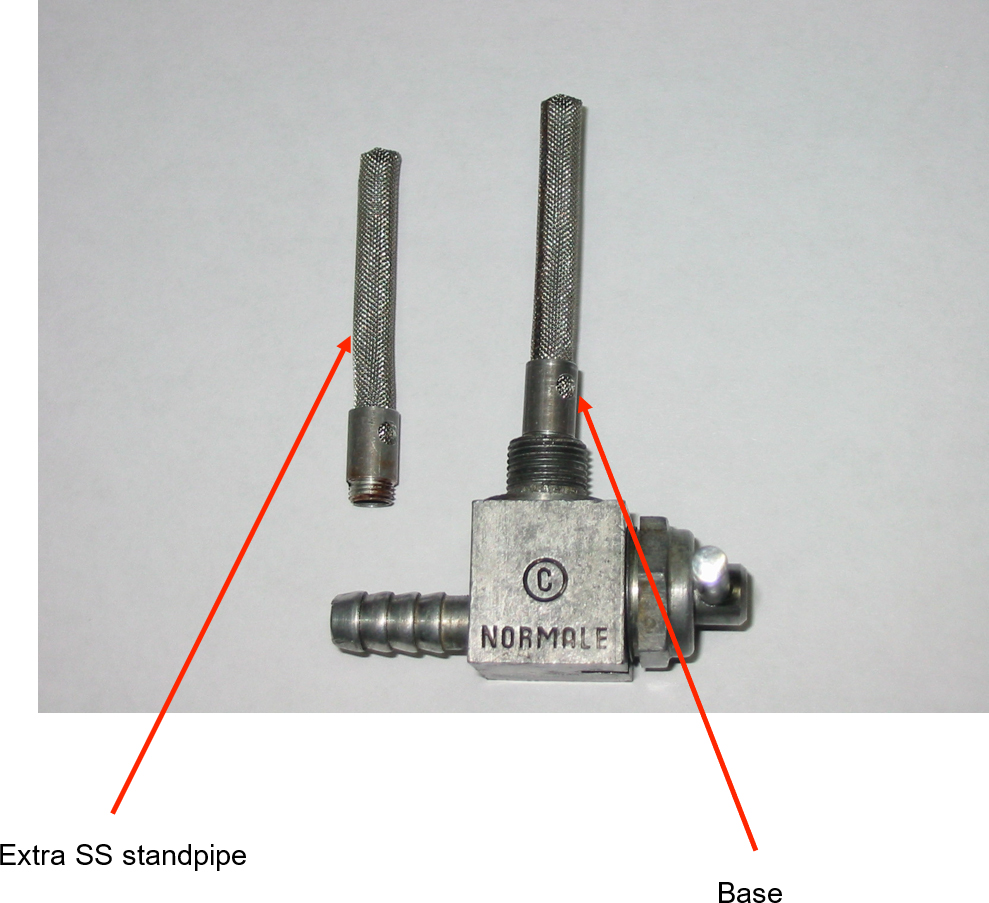
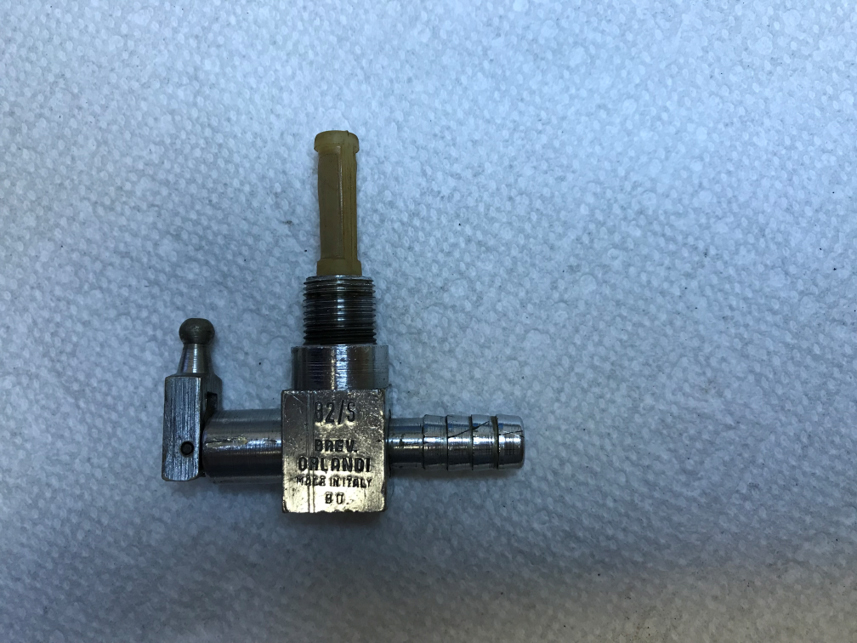
Figure 3 shows an assembled Orlandi 118/S aluminum petcock with a stainless steel mesh fuel filter/standpipe made by John Chicoine (jchicoine@verizon.net); one standpipe per on/off petcock. The stock standpipe is a fine plastic mesh but usually they get ripped and torn over the years. They are quite fragile after living in gas for much of their lives. The handle is pointing toward you so it can be hard to discern.
In Figure 3, gas will stop flowing when the fuel level reaches the top of the base of the standpipe. A standpipe is used to regulate (and filter the gas) how much gas remains in the tank when the fuel reaches this point. An On/Off/Reserve petcock will have two standpipes, one for On (a taller one) and a shorter (or none at all) for the Reserve housed within a single fuel filter.
Some petcocks are stamped Normale (Normal) or Reserva (Reserve) on the body. Normale and Reserva typically refers to the standpipe base height for On/Off petcocks. Normale will have a taller base section than the Reserva. For Loopframe saddlebag style gas tanks, having one Normale petcock and one Reserva just does not make sense. It is better to have two Reserva petcocks so each tank saddlebag can be completely drained. Of course, a Normale can be changed to Reserva by replacing the standpipe.
I use the right petcock on my Eldorado as the Main fuel source and the left one as Reserve. I adopted this regime for once I was going over 70 MPH on the DC Beltway in the left lane in the morning rush hour when I needed to switch to Reserve. Not fun pulling in the clutch, releasing the throttle, and trying to reach down to turn on the right petcock... with cars close on my tail....
I have never measured just how much fuel remains in the tank’s left saddlebag but it has been good for around 30-40 miles. I once did have a Washington DC’s AAA Road Ranger help me out with a drink o’gas when I ran dry on the Beltway going to work one morning.
Note:
The SETTI petcock shown in Figure 2 has a brass or copper fuel filter/standpipe instead of the typical plastic type. It appears to be a Reserve model.
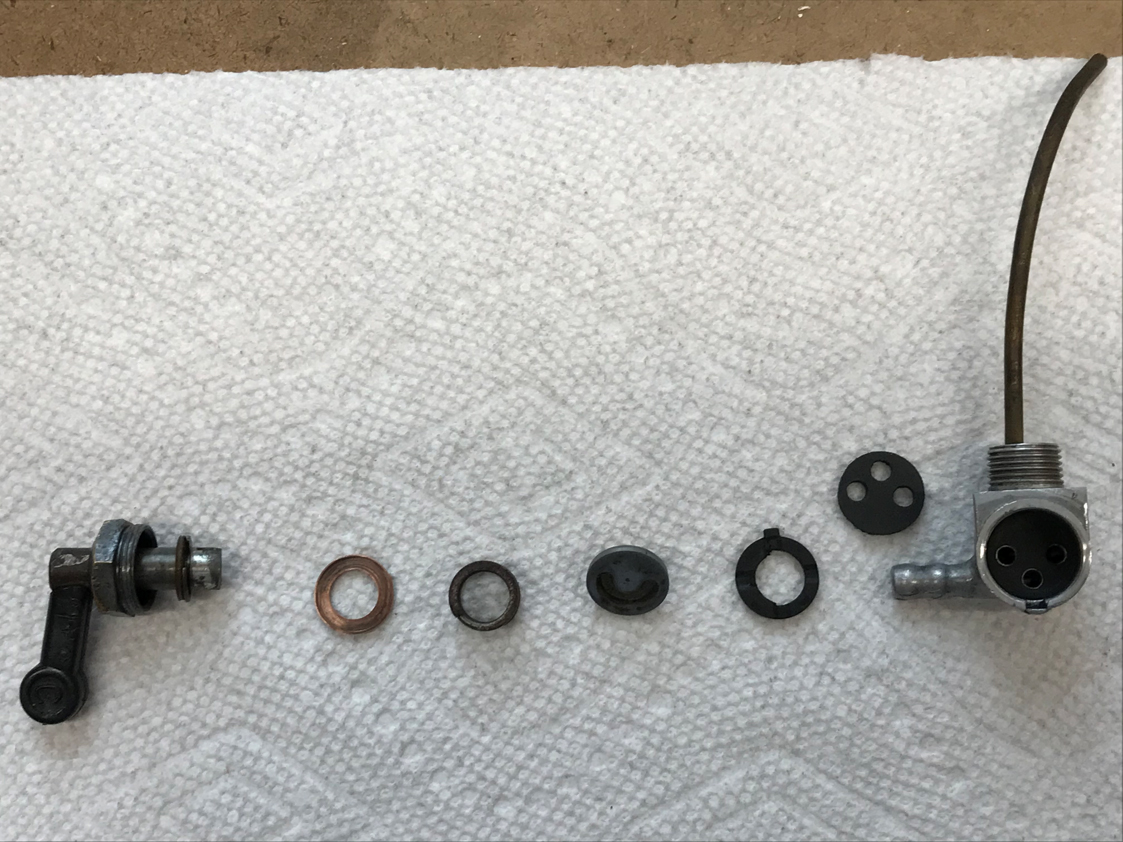
Exploded view
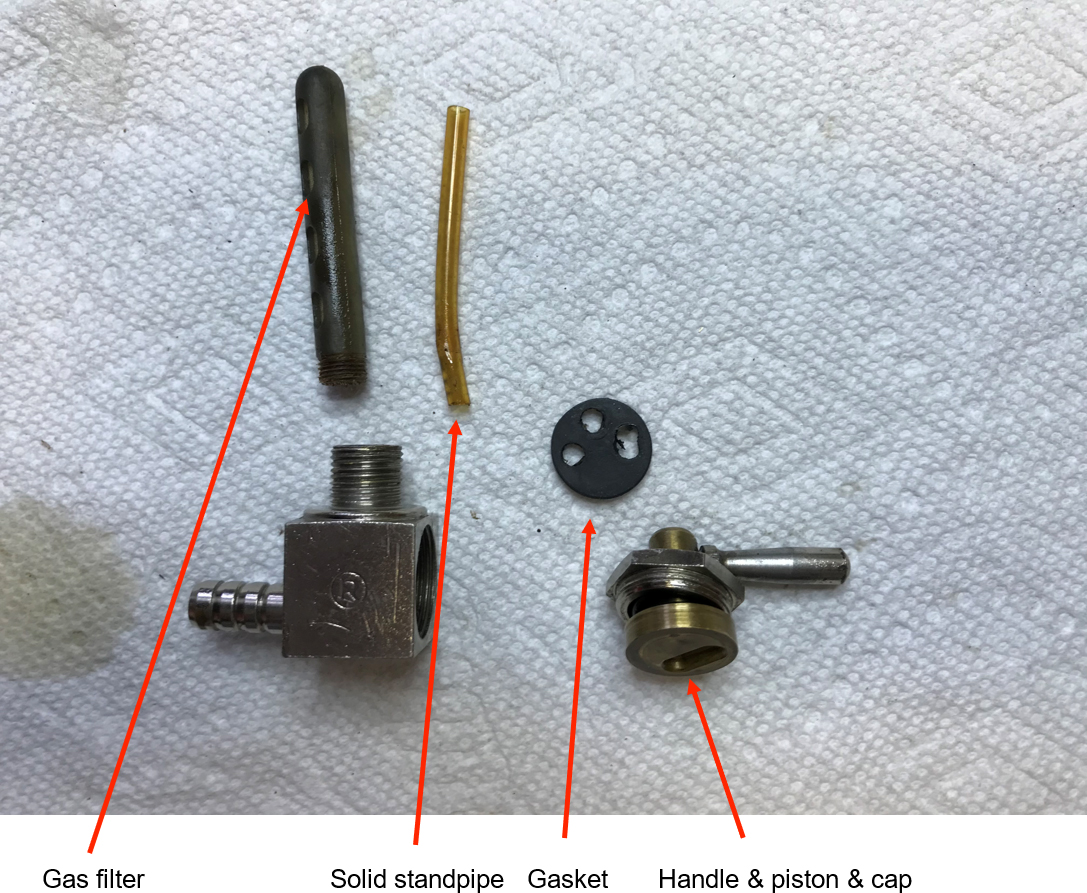
Figure 4 shows the same Orlandi petcock (in Figure 3) disassembled. As you can see, there are only five metal pieces inside the petcock (the gasket and standpipe are not shown). The piston is inserted into the body of the petcock and rests against the petcock gasket (Figures 5, 6). The face of the piston has a scooped out area to allow gas flow (Figure 7). The washer provides the dents when turning the handle; there is a tab on the dent washer which goes into a slot on the petcock body to hold it in place. The spring goes over the piston stem to hold the piston tightly against the gasket. The cap is screwed into the body of the petcock to maintain pressure on the spring. The handle screws into the threaded hole in the stem of the piston.
Sometimes leaks can be temporarily halted by tightening the petcock cap. You can turn the gasket over to use the other side but eventually a new gasket is required. After installing a new gasket, use the minimum of cap tightening to prevent gas leaks. Less pressure makes turning the handle easier and also allows more turns to tightening the cap later on.
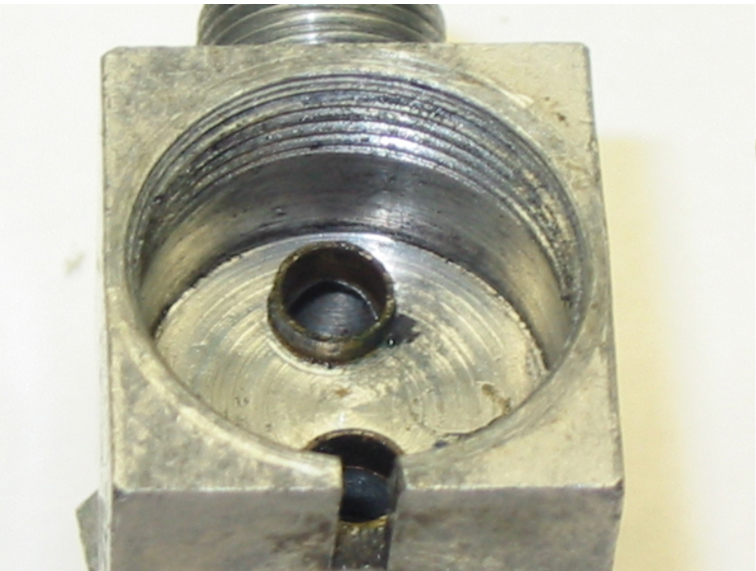
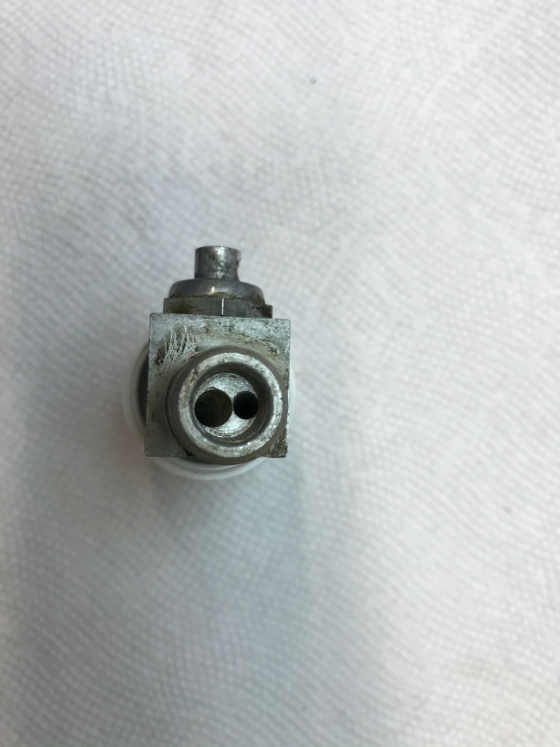
Looking into the body of the petcock, you will see two brass tubes that have been let into the body; see Figure 5. One tube is for the inlet of gas from the tank (in the figure, the top tube) and the other is the gas outlet to the carbs. The brass tubes perform two functions: 1) help the gasket seal against the tubes to prevent internal gas leaks and 2) prevent the gasket from rotating when the piston is rotated by the handle.
The most important fitment area for a gasket is around the brass tubes: the holes need to be slightly smaller than the OD of the tubes and correctly oriented on the gasket. The gasket’s OD is somewhat of a loose fit since if it is too wide, the gasket will not always sit flat or tend to be a hassle to install as you try to align the holes over the brass tubes.
The gasket has to be thicker than the height of the brass tubes otherwise the face of the piston’s disc will scrap on them; see Figure 6. I doubt that you can easily replace the brass tubes if they get damaged since they are pretty thin and can be easily deformed.
There are some aftermarket petcocks that do not have these brass tubes but just holes in the bottom of the well. The petcock gaskets have small ridges molded into the gaskets that are used to hold the gaskets in place as the piston rotates.
MG Cycle sells this type of replacement on/off/reserve Loopframe petcock that looks like the original units. The replacement gasket has the molded ridges; you can view them on their website.
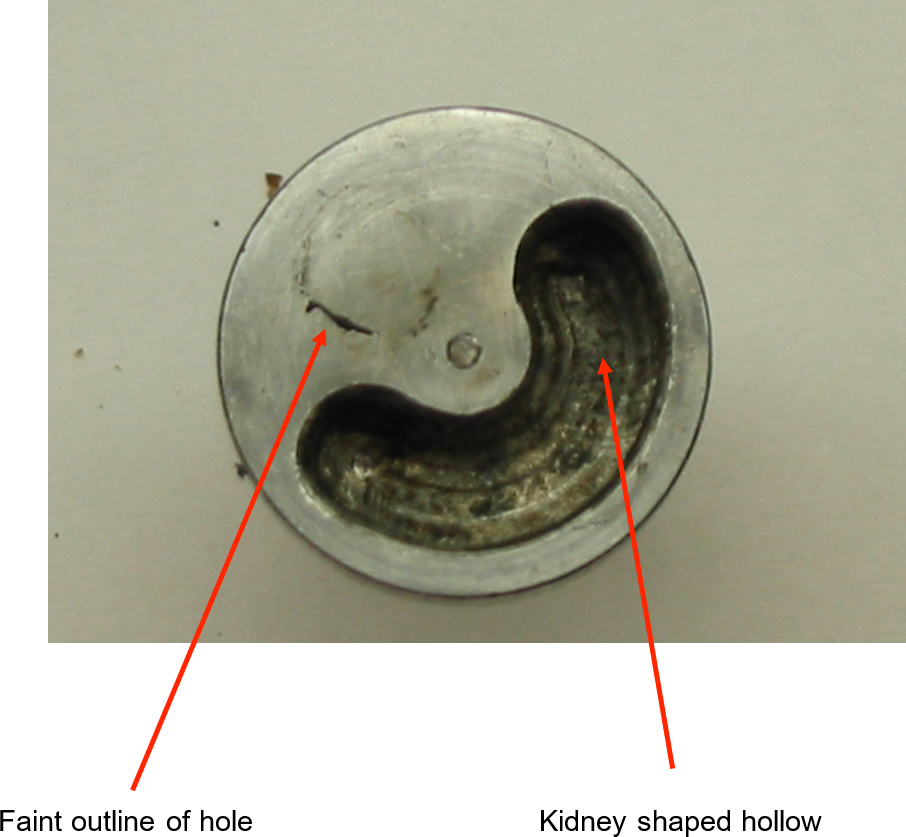
The disc of the piston is shown in Figure 7. You can see the hollowed out kidney-shaped section which allows the gas to flow. When the piston is rotated where the two brass tubes are under the hollowed out section, gas will flow to the carbs. In this Figure, you can see a faint outline of a circle on the disc where one of the holes in the gasket is resting against the piston - in the Off position - for a long time. The other hole in the gasket is under the hollow section.
I think that flattening the disc helps to prevent leaks as the piston rotates across the face of the gasket. I used knife sharpening stones to remove minor machine marks and flatten the surface. The flat surface might introduce a bit more friction but that is better than a dripping petcock.
On/Off/Reserve petcocks
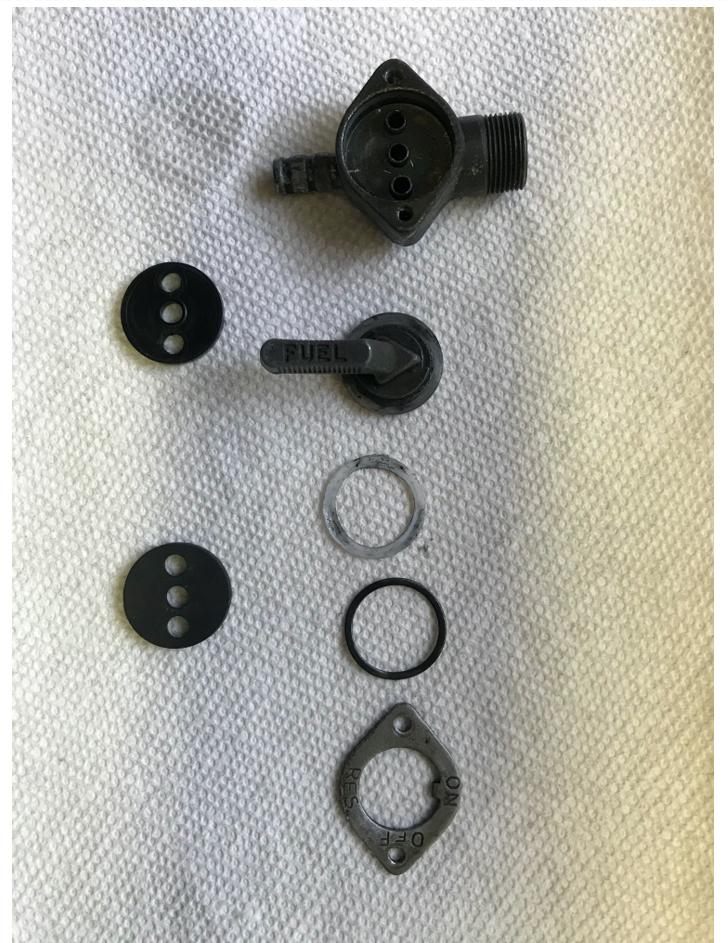
Other petcocks seen on Loopframes are On/Off/Reserve models but they operate pretty much like their less-complicated cousins. Figure 8 shows a chrome-plated petcock of no known manufacture.
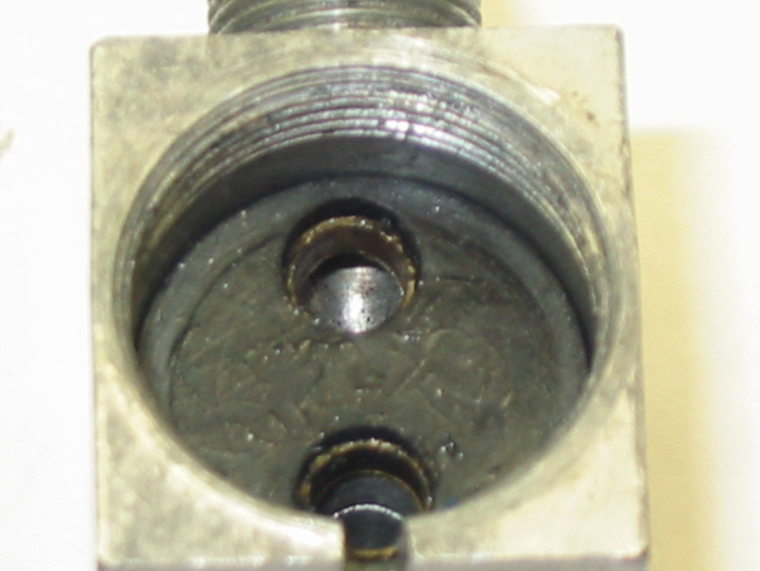
Instead of a single inlet hole at the top of the petcock, there are two inlet holes (Figure 9 shows a Paioli petcock as an example). This petcock has a single fuel filter that covers both inlet holes. One inlet hole has a friction-fit solid standpipe (the standpipe fits inside the fuel filter) and the other hole does not have a standpipe. The standpipe corresponds to the On fuel setting on the petcock and the other is for the Reserve setting.
In Figure 8 you can see that the 3-hole gasket is pretty beat up with one hole very badly out of round. The handle, disc & cap have been removed as a single piece. The handle can be very difficult to remove and once removed, there is a possibility of losing the handle unless blue Loctite is used (the length of the threads is quite short). The handle on this petcock is original because it has a small boss at the threaded end and is shaped similarly to a baseball bat.
But removing the three pieces as a single unit is the Easy Part. The Hard Part is to screw it back on to the petcock body. You need to maintain downward pressure to compress the spring, orient the cap threads perpendicular to the body (you can see that the disc cocked to one side in relation to the cap by the spring pressure) whilst turning the cap. I have to hold the petcock body in my bench vise whilst muttering a multitude of inventive invectives....
Older-Timey Loopframe petcocks
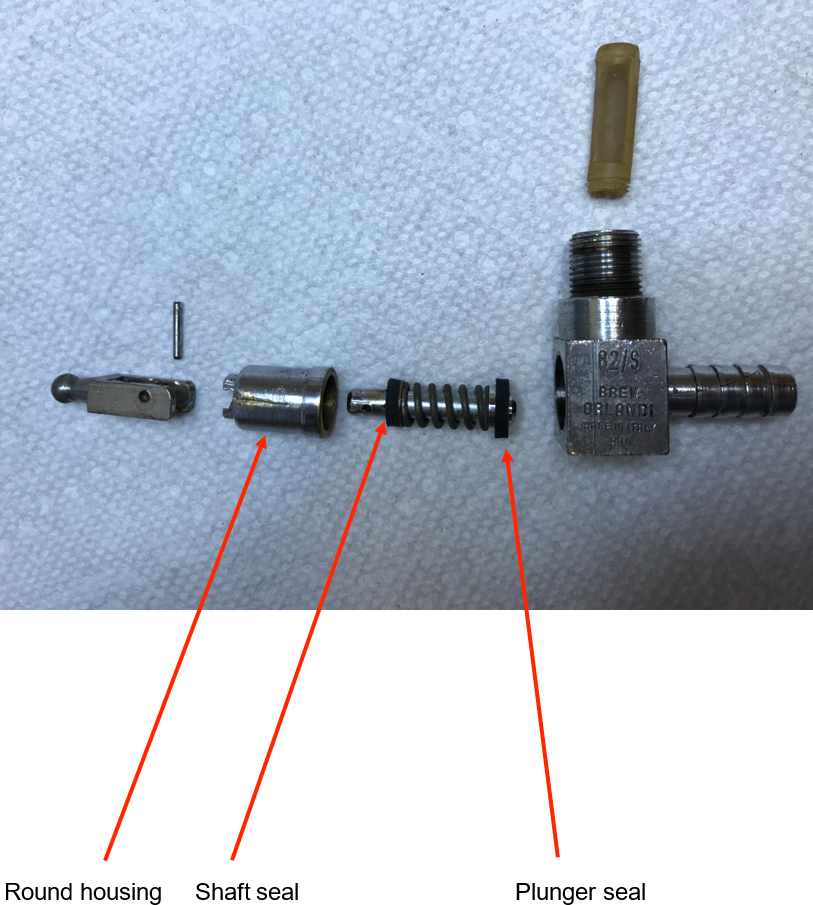
On older Loopframes, you might find toggle-action petcocks. These are the typical On/Off models but do not use a rotating disc. They use a spring action plunger to perform the same task. The Figure 10 shows the petcock in the Off position. When the toggle straightened out, it is in the On position (see Figure 11). You will notice that the plastic fuel filter/standpipe is a Reserve type since the base is so short.
There are two gaskets: 1) to seal the gas from going out the outlet at the end of the plunger and 2) to seal the plunger shaft from leaking in the round housing that is friction fitted into the body of the petcock.
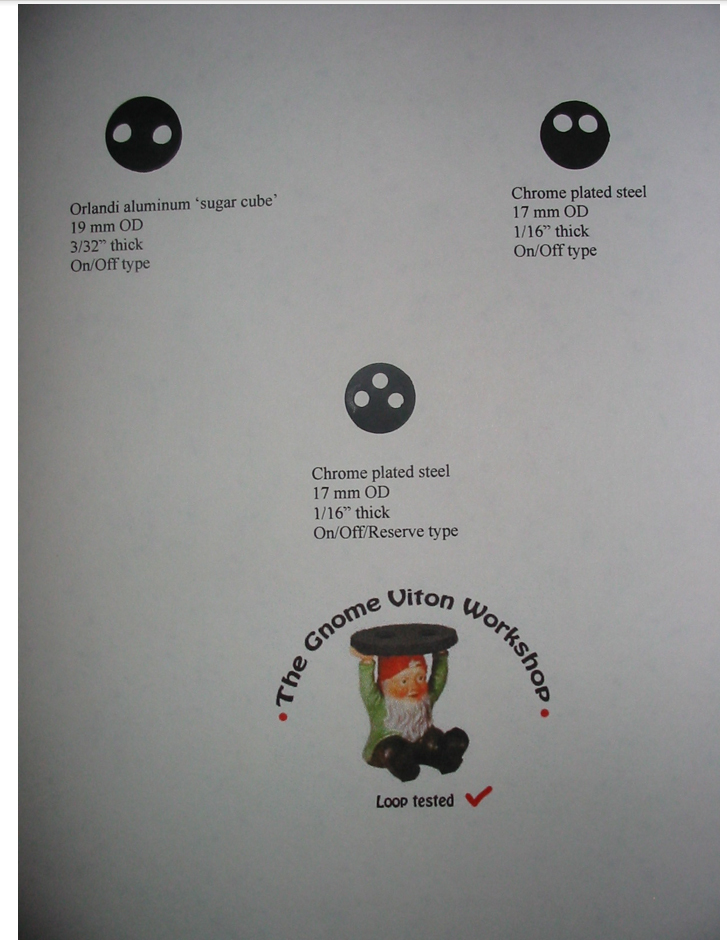
Other petcock gaskets can range from an OD of 15 mm up to 1 inch with 2, 3, or 4 holes in a variety of orientations of the holes. Some 3-hole gaskets have the holes along the circumference of the gasket and others have the holes strung across a diameter line. A 4 hole gasket the holes are evenly spaced on the circumference. There is one 4 hole gasket where one of the holes is a different size to engage a boss inside the petcock - this prevents the gasket from rotating when the disc is turned.
Fuel gaskets have a tough life these days with the new gasoline formulas. Rubber will not last long, Neoprene lasts a bit longer but Viton seems to be made for long term contact with the current gasoline formulations.
Petcock orientation on the Tank
Loopframe petcocks screw into the gas tank and a fiber washer goes against the tank to seal the juncture as the petcock is properly tightened down. However, the final orientation of the petcock can be somewhat arbitrary; obviously, you want the handle to be on the outside and the outlet spigot under the tank.
To help with this problem, there are alignment shims of various thickness to change the orientation of the petcock. The correct orientation is the one that works best for you and how you ride. I put my indexing shims between the petcock and the fiber washer - a new fiber washer is used whenever I remove a petcock.
Other petcock design
Banjo-style petcocks found on many later model bikes have fewer internal parts. Figure 13 shows an On/Off/Reserve model where can see that these use the same design as ours. Spring action is obtained by the wave washer that sits directly on the rotating disk. The top gasket shown is the original and the new one is below it: the original still has marks on the surface from being pressed inside the petcock.
The flat ring at the bottom which holds the petcock together, has stampings for On, Off, and Res(erve) so you know where to point the handle. The metal cast Pointer/Arrow on the Handle disc needs to point at the desired setting, not the lever section (stamped with Fuel) as with our style petcocks.
Sometimes the petcock handle can vibrate loose especially if you have removed it from the petcock piston shaft (please don’t ask how I know this). I have seen one petcock (Figure 14) where the DPO used a machine screw as a handle replacement.... Oh, the Humanity!
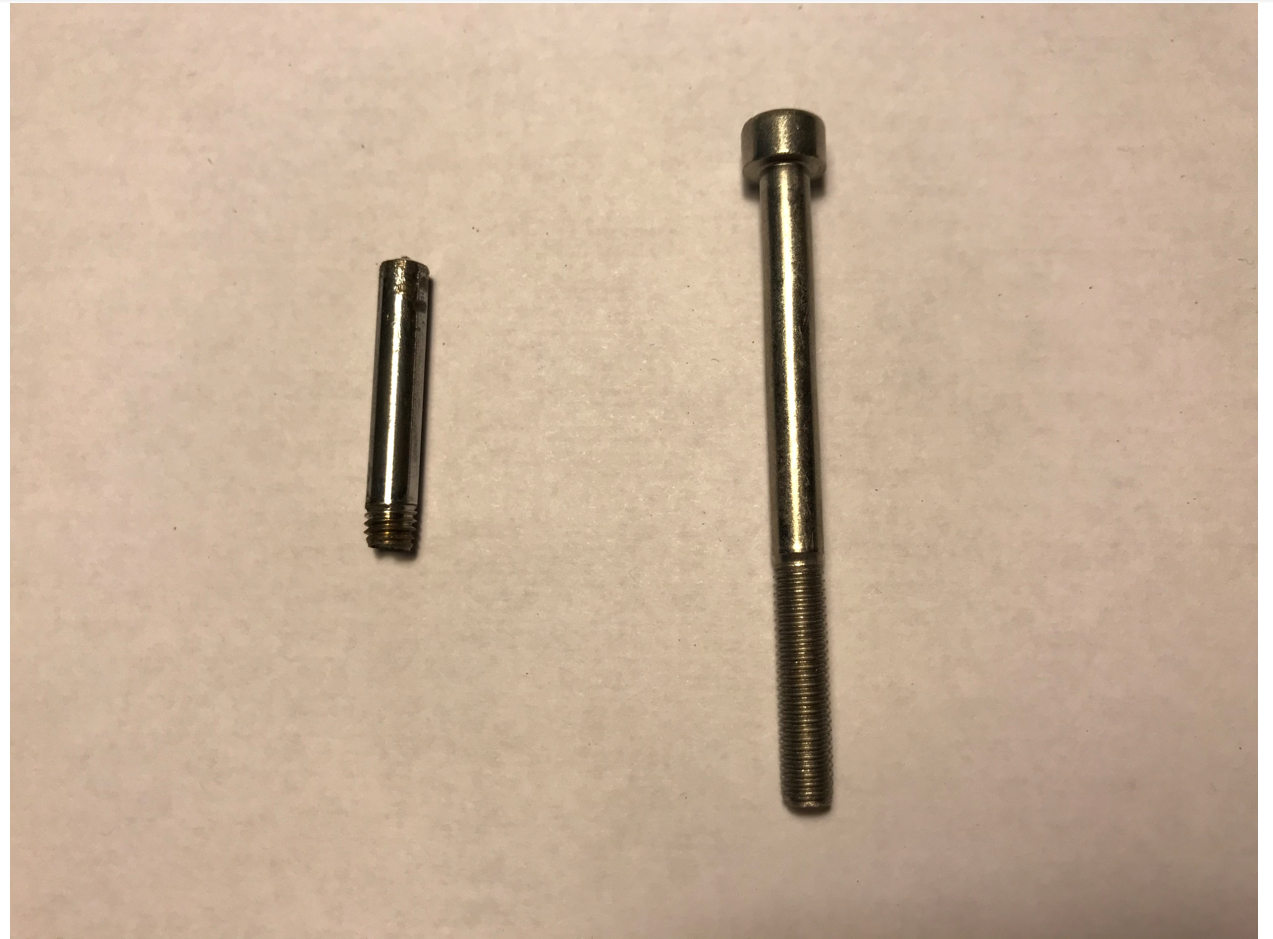
But you can save the day and make your own replacement handle by sourcing a stainless steel bolt that has a long unthreaded section (the bolt shank).
I did this for my Orlandi 118/S model when the handle went missing one day on a ride; at least it was on the Reserve petcock. Because I sorta like symmetry, I decided to make two handles. I removed the remaining original handle, measured the OD at the threaded portion, the pitch of the threaded portion, length of the handle, and the length of the threaded portion. My handle is 30 mm long with a 5 mm × 0.8 mm thread. The threaded portion is 4 mm long.
Then I went looking for SS screw or bolt that would allow me cut out a decent handle. I found a socket headed bolt with a 39 mm unthreaded length. The original and bolt are shown in Figure 15:
I removed a portion of the threaded section of the bolt to have 4 mm remaining, then cut the unthreaded section to size. I even filed the top to have the little tit on the top as did the original (look closely at Figure 15). Polishing SS a bit will make it look like chrome (from 10 ft away), so they fit in really well with the aluminum petcock body. I used some blue LocTite to hold them securely, they have been with me for decades now.
Just for Fun
Figure 16 shows a Karcoma petcock from moped, a On/Off/Reserve model (and the old gasket plus a new one). You can see it works on the same principles as most of our petcocks; rotating disc aligns with the various openings in the petcock. But the implementation is a bit different - notice the very large handle. And the very long standpipe. And the fuel inlet and outlet have different orientations than our typical Loopframe models and the Paioli shown in Figure 1.